
 by
by Basic Html tags are indispensable (Html, head, title and body) tags that make up the skeleton.
If we divide our site into parts; We can say head, body, footer.
<html> </html>
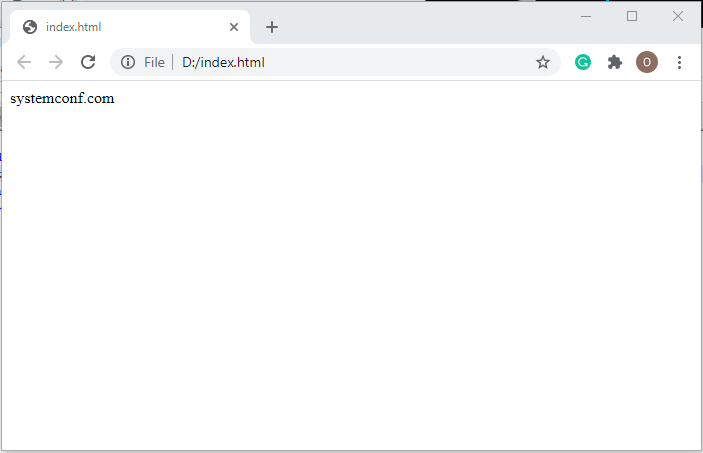
The Html tag is the tag that covers all the codes of our website. In other words, it tells browsers “I was written in Html” and “my extension is .html”. Usually, the homepage files of all websites are saved as index.html.
<html>
  All our HTML codes are written between Html tags.
</html>
<head> </head>
The head tag is the head tag of our website. This part includes the codings that indicate the features of our website, its content, the author of the website, and which subject the website is related to.
<html>
  <head>
    Head part of our website
  </head>
</html>
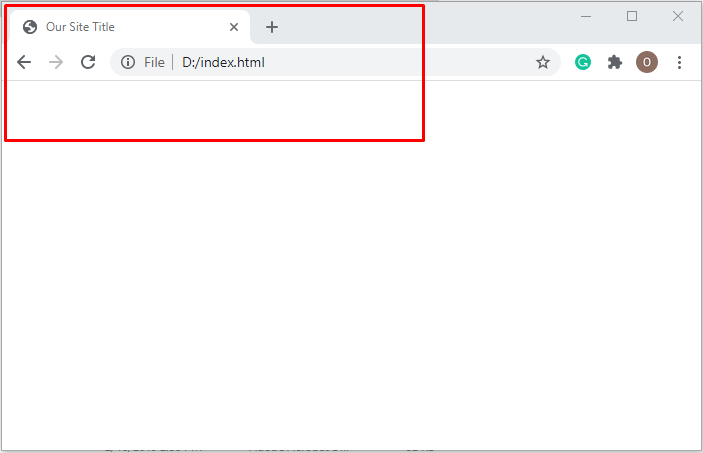
<title> </title>
It is mandatory to write the title tag inside the head tag. The title will be the title of our site as well as the title of our Html file. It will be better for us to define our website if the title we will write between the title tags is related to the content of our site.
<html>
  <head>
   <title> Our Site Title </title>
  </head>
</html>
<meta> </meta>
Meta tags allow us to define the Html page we have created and define our page with keywords. We will now tell you about a few important meta tags.
meta – keywords
It helps us to show keywords related to our site. For example; If we are building a site that provides information about the construction of a website, our keywords should consist of keywords such as Html, CSS, javascript, Php, asp.
<html>
  <head>
    <title> The Title of Our Site </title>
    <meta name = "keywords" CONTENT = "tag1, tag2, tag3, tag4, ...">
  </head>
</html>
meta-description
It is a tag that gives information about the content of your site. Google, Yahoo, Bing Yandex bots visit your site, collect information about your content and keep this information in their own records. They determine which searches your site will be included by looking at these tags. For example, in the example above, keywords related to the website are specified, and when these words are searched on search engines, your site will be included in this search. How many pages will you exit? it depends on how many daily or monthly visitors your site gets or how authentic and up-to-date the information on your site is.
<html>
  <head>
    <title> The Title of Our Site </title>
    <meta name = "description" content = "You can write what topic your website is about.">
  </head>
</html>
meta – author
It is the tag containing who made the website and the contact information of the producer.
<html>
  <head>
    <title> The Title of Our Site </title>
    <meta name = "Author" content = "Name, Email">
  </head>
</html>
meta tag
We can define the character of our website with the meta tag.
<html>
  <head>
    <title> The Title of Our Site </title>
    <meta http-equiv = "Content-type"
    Content = "Text / html"; charset = "UTF8">
  </head>
</html>
Note: meta tags must be written between head tags.
<body> </body>
The body tag is the tag that will cover all the rest of the content of our website. It is the part we call the body. All content of our site is written between body tags.
<html>
  <head>
    <title> The Title of Our Site </title>
  </head>
  <body>
All content of our site will be written between this tag.
  </body>
</html>
Other tags we will use within the body tag.

<h?> </ h?>
The h tag is a tag that sizes articles on our website and is often used for headings.
It is from h1 to h6. h1 is the largest dimension and h6 determines the smallest dimension. h? The tag should be closed with the same number. For example; A tag opened with h1 cannot be closed as h2.
<html>
  <head>
    <title> The Title of Our Site </title>
  </head>
  <body>
    <h1> Largest Font Size </h1>
    <h2> Large Font Size </h2>
    <h3> Medium Font Size </h3>
    <h4> Normal Font Size </h4>
    <h5> Small Font Size </h5>
    <h6> Smallest Font Size </h6>
  </body>
</html>

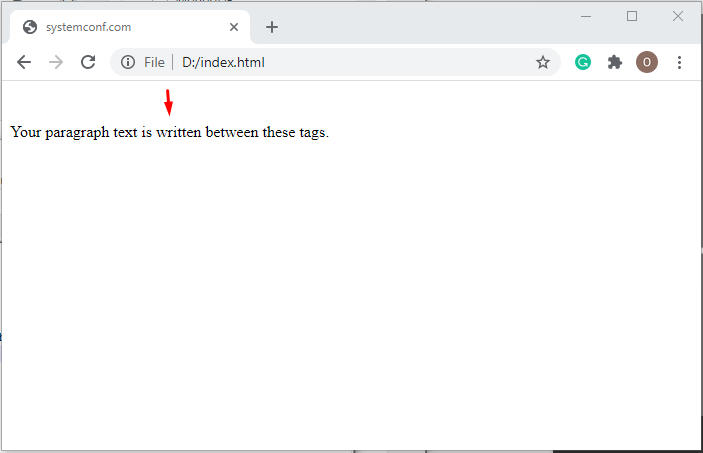
<p> </p>
The p tag is used to describe paragraphs. When you write a text, it should be written between this tag.
<html>
  <head>
    <title> systemconf.com </title>
  </head>
  <body>
    <p> Your paragraph text is written between these tags. </p>
  </body>
</html>
<ul> </ul>, <ol> </ol> and <li> </li>
These tags are list tags. Among these tags, we specify the items we want to list on your website.
ol tag
The ol tag is a numbered list tag.
<html>
  <head>
   <title> The Title of Our Site </title>
  </head>
  <body>
    <ol>
      <li> List 1 Item </li>
     <li> 2nd List Item </li>
     <li> 3rd List Item </li>
     <li> List 4 Item </li>
      <li> List 5 Item </li>
    </ol>
  </body>
</html>
ul tag
The ul tag is an unnumbered list tag.
<html>
  <head>
    <title> The Title of Our Site </title>
  </head>
  <body>
      <ol>
        <li> List 1 Item </li>
        <li> 2nd List Item </li>
        <li> 3rd List Item </li>
        <li> 4th List Item </li>
        <li> List 5 Item </li>
     </ol>
  </body>
</html>
li tag
The li tag is the tag that specifies the items of the lists. Even if the li tag is not closed, it will not be a problem. You can turn it off if you want.

<p> </p>
None of the editors we use take into account the extra space between our code, the usage of tabs. For example,
<html>
  <head>
    <title> systemconf.com </title>
  </head>
  <body>
     <p>
       <h4>Today      is        Saturday </h4>
     </p>
  </body>
</html>
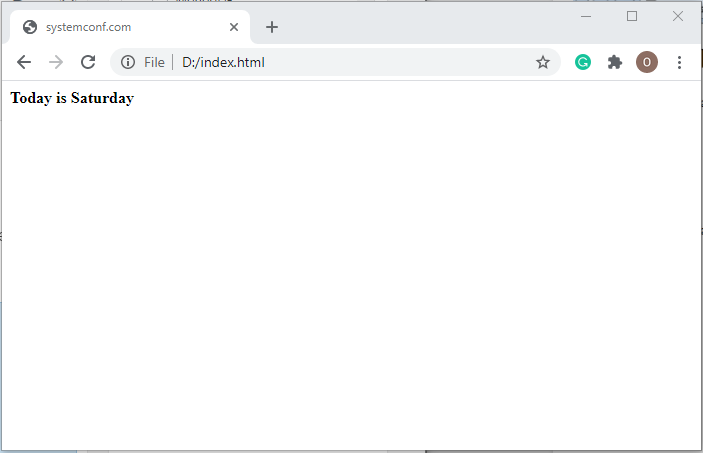
When we write, our output will be “Today is Saturday”. In other words, our editor will write normally, ignoring the extra spaces we have left. This is where our pre label comes in. If we want to adjust the spaces in our articles by ourselves and write a list or other text in this way, our editor will consider all the spaces and tab usage when we write these articles between our pre tags. We can see our codes and their output as follows.
<html>
<head>
<title> Our Title of Our Site </title>
</head>
<body>
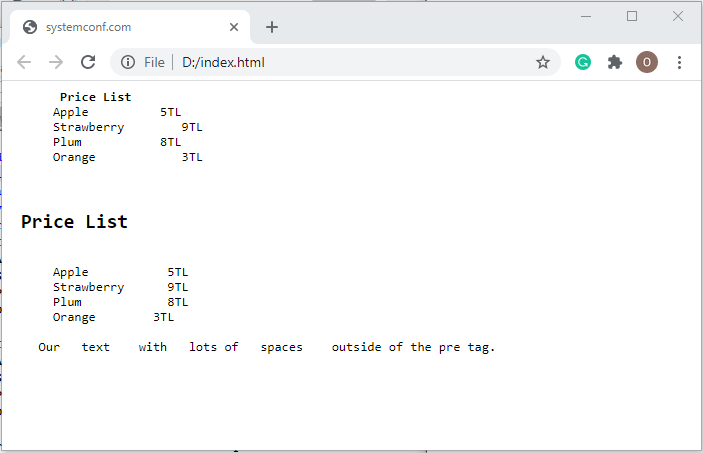
<pre>
<strong> Price List </strong>
Apple 5TL
Strawberry 9TL
Plum 8TL
Orange 3TL
<h2> Price List </h2>
Apple 5TL
Strawberry 9TL
Plum 8TL
Orange 3TL
</ pre.>
Our text with lots of spaces outside of the pre tag.
</body>
</html>
<strong> </strong> | <b> </b>
strong and b tags are tags that make the characters they contain appear bold. Both serve the same task.
<strike>
The strike tag is a tag that makes the characters it covers appear strikethrough.
<em> <i>
The em and i tags are tags that make the characters they contain appear italic (italic).
<u> tag
u tag is the tag that makes the characters it covers appear underlined.
Let’s see the above spelling tags in a single example.
<html>
<head>
<title> The Title of Our Site </title>
</head>
<body>
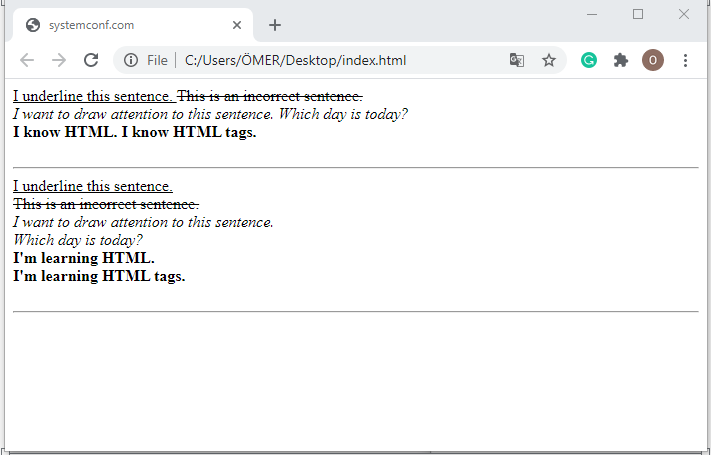
<u> I underline this sentence. </u>
<strike> This is an incorrect sentence. </strike> <br/>
<i> I want to draw attention to this sentence. </i>
<em> Which day is today? </em> <br/>
<strong> I know HTML. </strong>
<b> I know HTML tags. </b> <br/> <br/>
<hr>
<u> I underline this sentence. </u> <br/>
<strike> This is an incorrect sentence. </strike> <br/>
<i> I want to draw attention to this sentence. </i> <br/>
<em> Which day is today? </em> <br/>
<strong> I'm learning HTML. </strong> <br/>
<b> I'm learning HTML tags. </b> <br/> <br/>
<hr>
</body>
</html>
Our madness will be as follows.
<br> Tag
In the example I gave in the post formatting tags, you may have noticed that I typed the codes twice. In this example, the task of the br tag you encounter for the first time is to move to a lower line as you understand. The first spelling form does not have a br tag and the sentences are side by side. If you want to leave a line or more of space between two texts, you can put a tag in a row. The br tag is not closed.
<hr> tag
The hr tag is used to draw a line between two paragraphs, as seen in the example above.
<img> </img>
The img tag is the tag you will use to add an image to your website. It is written between img codes. It also has some features (such as size, frame, right and left justification, link, title, etc.) but I have covered them more extensively in my article Adding and Editing Html Images.
<html>
   <head>
      <title> systemconf.com </title>
   </head>
   <body>
      <img src = "D:\SYSTEMCONF\SITE\systemconf.png"> </img> <br> <br/>
      <img src = "D:\SYSTEMCONF\SITE\systemconf.png" />
   </body>
</html>
When adding an image to your website, you determine where to choose it from, with the “src” feature in coding. The “src” feature shows scanners the address of the image. If we want to take a picture from our site files, we need to specify the folder containing the picture we want to take, if you want to take the picture by giving a link, we must specify the link of the picture in the “src =” section with quotes “”. As seen in the example, it can be closed in two different ways. Now let’s print these codes.
Note: Our advice to you is always to specify the file address, not the official link you want to view. Because when you link, the link you provided may be deleted or the site owner may have removed that image, and this will cause that image to not appear on your site. Follow a healthier way by filing. For example, collect your site files in a folder named “Web Site” and have “index.html” and “Pictures” folders in this folder. Call the picture you want to take as src = “Pictures / picture_name.jpg“.
<a> </a>
The a tag is the tag that allows us to create links. The a tag is used to switch between the pages of our website or other pages. This tag has some properties such as the “img” tag. I will talk about them in another article, but I will explain the most important feature of href = ”” and target = ”” in this article. Links appear as standard in blue underlined in browsers. A link that we have visited before appears in purple. When we move the mouse over the link, we see that the color of the link is red and underlined. This coloring is standard on all browsers. Of course, our friends who make a website today can color these links in accordance with the theme and colors of the site.
href = “”
The href = ”” feature is the feature that includes where we will be directed when this feature is clicked. So it determines the URL we will go to. target = ”” property determines where the page we will go to opens. We use this feature to specify whether the link will be opened on the page we clicked on or in a new tab, ie a new page. These are _blank, _parent, _self, _top but we are only going to use the _blank and _self attributes. The _blank feature opens the clicked link in a new tab or a new window. _self opens the clicked link on the same page.
<html>
   <head>
      <title> The Title of Our Site </title>
   </head>
   <body>
      <a href="https://www.systemconf.com" target="_blank"> Systemconf.Com </a>
      <a href="https://www.systemconf.com" target="_self> </a>
   </body>
</html>
It is useful to mention that, do not forget to write something between the a codes. If you do not give a name to the link you have created, you will not be able to click on the link as it will not be displayed. If you want, let’s take a look at the output of these codes.
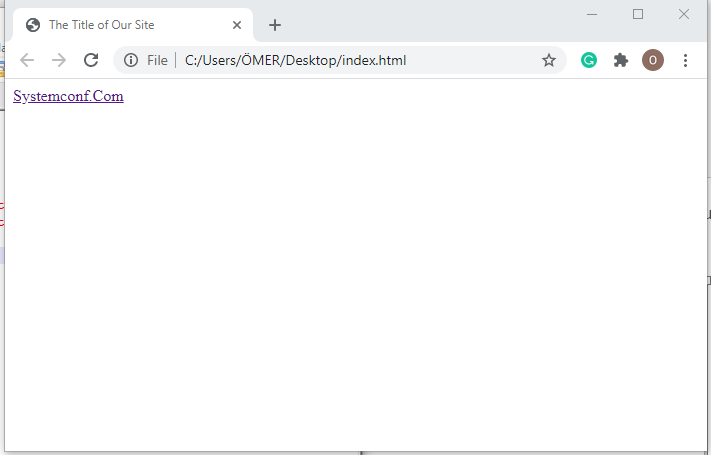
As you can see, we encoded two links in our codes, but only one link appeared in our output. The reason for this is that we did not write anything between the a tags on our 2nd link.


