

 by
by Microsoft Exchange Server is a scalable communication and collaboration platform developed by Microsoft for companies to centrally manage their communication traffic. It supports many features such as e-mail and document sharing, calendar, contacts and data storage. Thanks to its superior security and data storage features, Microsoft Exchange Server allows companies to manage their communication traffic by the regulations and securely.
It works interactively with Microsoft Outlook and similar e-mail clients and smart devices. With its mobile and cloud-based collaboration and communication features, Microsoft Exchange Server allows users to communicate over many different platforms and store data in a single point. In addition to all these features, Microsoft Exchange Server helps businesses protect from the negative effects of server, database and network connection failures with data backup and disaster recovery solutions.
What Can You Do With Microsoft Exchange Server?
- Email and document sharing.
- Central communication traffic management.
- Secure data storage and data backup.
- Creating and managing calendar and contacts.
- Cloud and mobile-based collaboration.
- Automating processes through rules.
Exchange Server 2016 Architecture
The final version of Exchange Server 2016 was made publicly available on October 1, 2015. This article will show you Exchange Server 2016 architectural changes, system requirements, and installation steps. We tried to make the Exchange Server 2016 installation steps as concise as possible. The purpose of this article is to guide you to create an Exchange Server 2016 organization where all roles are gathered on the same server and you can quickly stand up for any purpose, rather than building an Exchange Server 2016 topology that works in a large-scale, distributed and highly available architecture.
When we look at the role distribution, we see that there is a simplification in the Exchange Server 2016 architecture. Unlike previous versions, Exchange Server 2016 versions can only be deployed in 2 roles. These; Mailbox Server and Edge Server. For example, CAS(Client Access) functions can no longer be installed on a separate server as a role. Instead, it comes as a Windows service attached to the Mailbox role. The main reason for this is that powerful hardware is now more easily available.
Roles could be divided into 5 different roles in Exchange Server 2007 and 2010: Mailbox, Client Access, Hub Transport, Unified Messaging, and Edge. In Exchange Server 2013, this role deployability was reduced to 3. These; Mailbox is Client Access and Edge roles. In Exchange Server 2016, there are only 2 roles. These; Mailbox and Edge are roles.
There is a nice resource on Exchange Server 2016 architecture at the link below. You can check it for more details.
https://techcommunity.microsoft.com/t5/exchange-team-blog/bg-p/Exchange

Exchange Server 2016 Installation Steps
The Exchange Server organization we have built in this article is simply as follows.
There will be an Exchange Server 2016 with the Mailbox role on Windows Server 2012 R2.
There is no edge role in the build. In Exchange Server 2016, all email flow with the outside world is handled directly by Mailbox Server.
Management tools such as Exchange Toolbox and Exchange Management Shell are still running on the Mailbox server.
There is a single Active Directory Forest and a single Active Directory Domain in the structure. DC OS version, Forest and Domain Functional levels are Windows Server 2012 R2.

System requirements
1. At least Windows Server 2012 is required as server operation. It can be a Standard or Datacenter version, but it must have a graphical installation option (with GUI). Server Core is not supported. We recommend that the region and language settings be configured with English & United States options.
2. The server operating system must be made a member of the Active Directory domain.
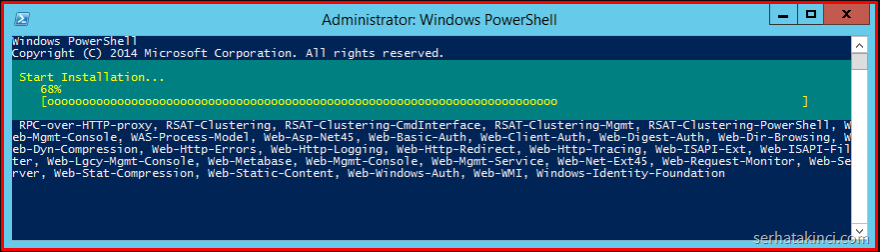
3. Install the Windows Features required for the Mailbox role. For this job, start a PowerShell console on the server in administrator mode and run it by pasting the following line. Then you need to restart the server.
Install-WindowsFeature AS-HTTP-Activation, Desktop-Experience, NET-Framework-45-Features, RPC-over-HTTP-proxy, RSAT-Clustering, RSAT-Clustering-CmdInterface, RSAT-Clustering-Mgmt, RSAT-Clustering-PowerShell, Web-Mgmt-Console, WAS-Process-Model, Web-Asp-Net45, Web-Basic-Auth, Web-Client-Auth, Web-Digest-Auth, Web-Dir-Browsing, Web-Dyn-Compression, Web-Http-Errors, Web-Http-Logging, Web-Http-Redirect, Web-Http-Tracing, Web-ISAPI-Ext, Web-ISAPI-Filter, Web-Lgcy-Mgmt-Console, Web-Metabase, Web-Mgmt-Console, Web-Mgmt-Service, Web-Net-Ext45, Web-Request-Monitor, Web-Server, Web-Stat-Compression, Web-Static-Content, Web-Windows-Auth, Web-WMI, Windows-Identity-Foundation
4. If it is not installed, install the Runtimes below.
5. After installing the prerequisites, we recommend that you perform a full update via “Windows Update“.
6. Prepare the Exchange Server 2016 installation source and position it so that it can be accessed through the server. If you do not have the installation source, you can download the 180-day trial version from the link below.
https://www.microsoft.com/en-us/microsoft-365/exchange/compare-microsoft-exchange-online-plans
7) Preparation of Active Directory and Schema update are needed. First, we remind you of the following situations:
- “Forest Functional Level” must be at least Windows Server 2008.
- The “Schema Master FSMO” role must be held by at least a Windows Server 2008 version DC.
- The account to perform the “Schema” upgrade must be a member of either the “Enterprise Admins” or “Schema Admins” groups.
After meeting the above requirements, you can choose one of the following two options (7.1 or 7.2) for Exchange Server 2016 AD preparation and schema update operations. What we want to achieve is the Exchange Server Schema Version = 15317.
7.1. If you wish, the “Exchange Server 2016” installation wizard can automatically perform the “Active Directory” and “Schema” updates for you. This is very practical in our opinion. But remember that in this option, “Active Directory Domain Services” management tools (RSAT) must be installed on the server before starting Setup. For example, you can easily install it via “PowerShell” with “Install-WindowsFeature RSAT-ADDS“.
7.2. If you want, you can perform the “Active Directory” and “Schema” update operations directly by giving parameters to setup.exe in the installation source. You can perform it on the server you have prepared as Mailbox Server or perform it on a different server after moving the Exchange Server 2016 installation source.
In the command line tool started in Administrator mode, change to the directory where the Exchange Server 2016 installation source (setup.exe) is located. (For example, like D:\Exch2016>). Below are the commands you need to run. The first is for the “Schema” update, the second is for the “Active Directory” update. If you are going to use this method, do not forget to change the “Exchange Org” statement in the second line. This phrase represents the name of the Exchange organization and you will not be able to change it later.
setup /PrepareSchema /IAcceptExchangeServerLicenseTerms
setup /PrepareAD /OrganizationName:”Exchange Org” /IAcceptExchangeServerLicenseTerms
You can also check the Exchange Server “Schema Version” by running the “PowerShell” line below. If you install the first Exchange Server in the environment and have not yet performed a “Schema” update, the result will return a blank. After completing the “Schema” update, the result should return “15317“.
“Exchange Schema Version = ” + ([ADSI](“LDAP://CN=ms-Exch-Schema-Version-Pt,” + ([ADSI]”LDAP://RootDSE”).schemaNamingContext)).rangeUpper
We proceed by leaving the “Active Directory” preparation and “Schema” update process to the “Exchange Server” setup wizard, that is, by choosing 7.1. Of course, we installed AD management tools with “Install-WindowsFeature RSAT-ADDS” beforehand.
Install-WindowsFeature RSAT-ADDS
Exchange Server 2016 Installation
To start the Exchange Server 2016 installation, run the setup.exe in the setup source.
The “Check for Updates” step, checks if there is an update for Exchange Server 2016.

No updates will appear. Continue by clicking the “Next” button.

The necessary files for installation are being prepared.


We proceed by clicking the “next” button on the “Introduction” page.

On the “License Agreement” page, we accept the license agreement and proceed by clicking the “next” button.

The “Use recommended settings” option on the “Recommended Settings” page allows the online databases to be automatically checked in case of errors and if a matching solution is found, it is displayed. But you also agree to send some usage statistics about Exchange Server features to Microsoft. Choose between “Don’t use recommended settings“, which disables these functions, and proceed by clicking the “Next” button.

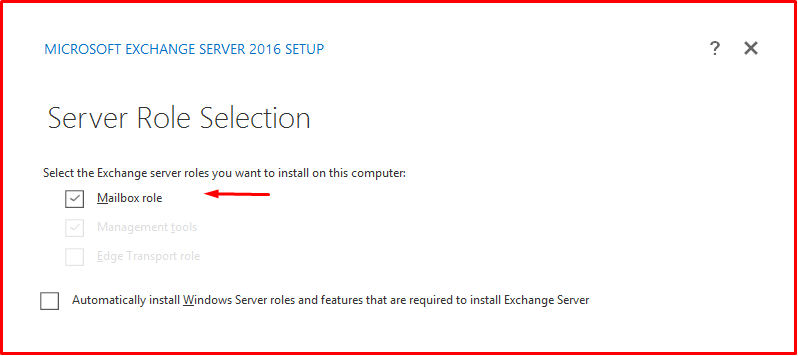
On the “Server Role Selection” page, select which server role you want to install. “Management tools” is automatically installed on the server where you installed the Mailbox role. Also, you cannot install the “Mailbox” and “Edge” roles on the same server.
Again on the “Server Role Selection” page, the “Automatically install Windows Server roles and features that are required to install Exchange Server” option ensures that the prerequisites such as the Windows features we provided at the beginning are installed by the setup wizard according to the selected role.
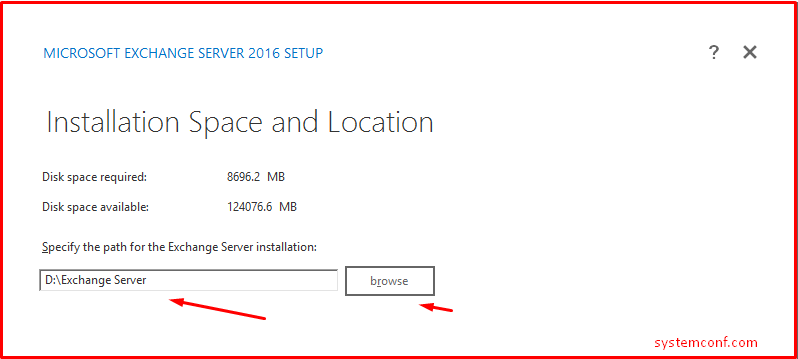
Specify the disk path to be installed on the “Installation Space and Location” page and click the “Next” button to proceed.
A new organization will also be created on the “Exchange Organization” page, as the first Exchange Server setup in the environment takes place due to the scenario. We are choosing a name for this new Exchange organization.

Requirements are checked on the “Readiness Checks” page. For example, we left the “AD” and “Schema” update jobs to the setup wizard. Below is information on how these will also be carried out. If deficiencies that need to be provided are detected, they will be listed at this stage. If there is no problem, click the “install” button to start the Exchange Server 2016 installation.

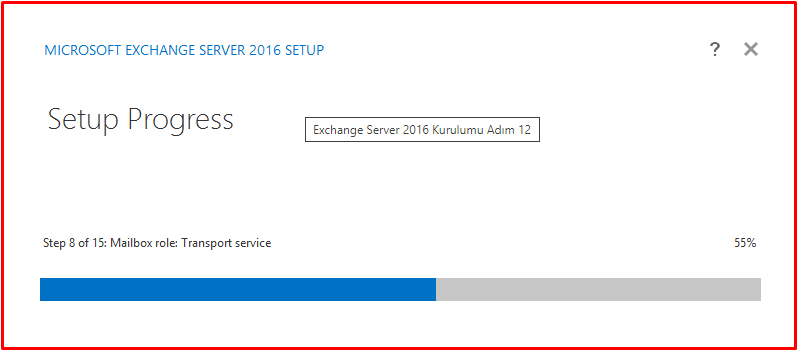
On the “Setup Progress” page, the installation proceeds as follows.
The installation is completed on the “Setup Completed” page.

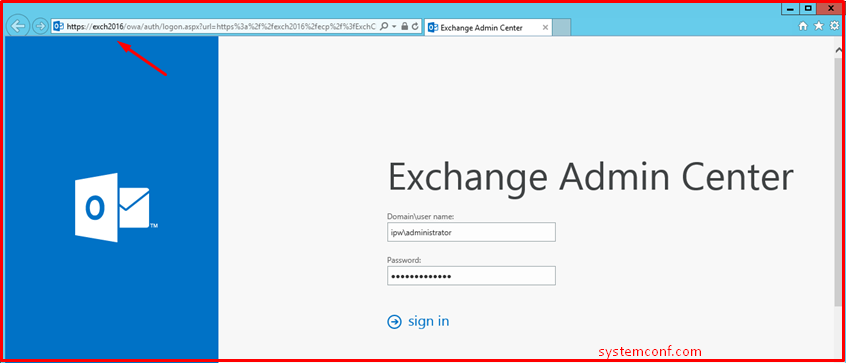
After the installation is complete, you can finish the installation wizard with the “finish” button as above. Then the Exchange Admin Center, which is a web-based management interface, opens in the browser. You can also access the “Exchange Admin Center“, which is normally a Web-based management interface, as https://ServerName/ecp.
It is possible to perform many important administrative operations through the web-based “Exchange Admin Center“.

Exchange Server 2016 Initial Settings
After the Exchange Server 2016 installation, there are a few more steps you need to complete for healthy email communication. Complete these steps by following the instructions below.
1. We create a new “Send Connector” for e-mail sending.
No, Send Connectors are created with Exchange Server installation. And we can’t send emails to the outside world until we create a new one. To do this, open the Exchange Management Shell and create a “Send Connector” using the PowerShell line below.
The features of the resulting Send Connector are as follows.
- Its name is “First Send Connector”.
- It is not associated with any Smart Host. It performs e-mail delivery by making MX queries directly to the DNS server defined in TCP/IP settings.
- It allows sending e-mails to the outside world up to 35 MB in size. (Message body + Attachments)
- Logging is on.
New-SendConnector –Name “First Send Connector” -Usage Internet –AddressSpaces “SMTP:*;1” –DNSRoutingEnabled $true –UseExternalDNSServersEnabled $false -ConnectionInactivityTimeOut 00:10:00 -MaxMessageSize “35 MB” -ProtocolLoggingLevel Verbose

2. Receive Connector setting to receive email from non-Exchange Server servers
After Exchange Server 2016 installation, “Receive Connector” named “Default Frontend“, “Anonymous Users” option comes active. Therefore, you do not need to set any special “Receive Connector” settings to receive e-mail from non-Exchange Server e-mail servers.
3) Creating NAT and Publishing Rules
For Exchange Server to receive e-mail from the outside world, 25 TCP (SMTP) ports on the Firewall must be NATed to the Exchange Server. Since the Edge role is not installed in this article, NAT operation should be done directly to the Mailbox role.
If you want to publish services such as Autodiscover, OWA, Outlook Anywhere other than SMTP (Port: 25), you will also need the 443 TCP (TLS) rule. In addition, issues such as the use of the certificate and who will terminate TLS traffic are also important. However, in terms of SMTP traffic, 443 is of no importance.
4. Creation of MX and SPF Records
For other servers to find your e-mail server, especially during e-mail delivery, you need to create an MX record under the DNS management of the relevant domain name (mail domain) and point to the Exchange Server’s external IP address (in front of NAT). Although it varies according to the structure, the MX record is usually created on DNS servers that meet external queries.
You can create the MX record on the Windows DNS service as follows.

If your server is delivering email to a different server, the other party may be looking at the “SPF” record to verify you. To avoid problems in such cases, create an “SPF” record under the same “DNS zone“.
You can create the SPF record on the Windows DNS service as follows.
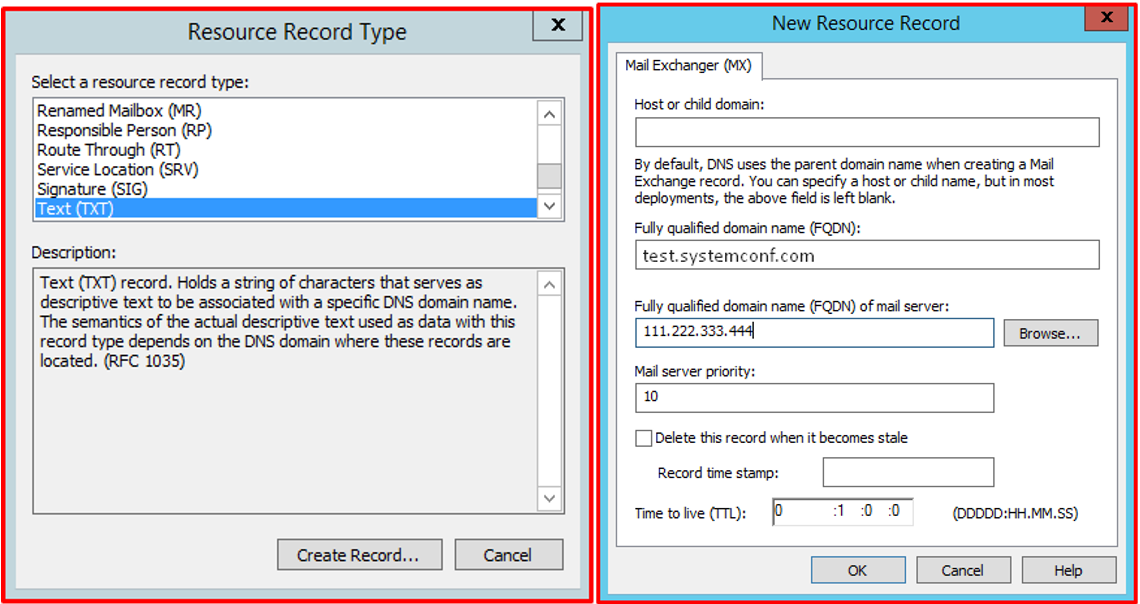
“MX” and “SPF” record in the last case both look like below.

5) Testing SMTP communication and email sending
You can perform MX and SMTP tests by using the mxtoolbox.com service to check the accuracy of the transactions made up to this step.


