

 by
by Before we start with Gophish, we will explain what Phishing is.
What is Phishing?
It is a type of online attack in which fraudsters send emails to random user accounts. Emails appear to be sent from reputable websites or from the user’s bank, credit card company, e-mail or internet service provider. Usually, personal information such as credit card number or password is asked to update accounts. These emails contain a URL link that directs users to another website. This site is actually either a fake or a modified website. Users are also asked to enter their personal information to be forwarded to the phishing attackers when they visit this site. It is generally used to find out a person’s password or credit card information. We can now start with Gophish.
What is Gophish?
As it is known, the weakest link in information security is always the end-users. Recently, increasing phishing attacks are always on the weakest link of the chain. And as can be seen, these attacks are extremely successful. As people responsible for ensuring the security of the institutions, we should not neglect the training and awareness of the user, no matter what product we use at the back, whatever infrastructure we create.
In this article, we will see how useful these awareness trainings are and how to create a test environment to evaluate user-side awareness.
GoPhish is a free open-source application that enables us to create a phishing attack scenario. As can be seen, it is extremely simple.
Download – Installing Gophish on Windows
First, we download the Gophish app from https://getgophish.com/.
By clicking the “Download” button, we download the application suitable for our operating system.
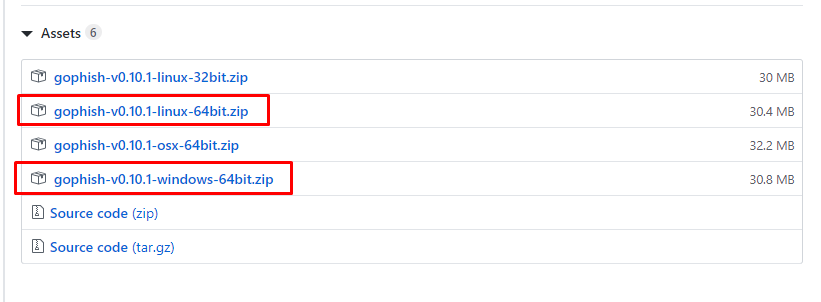
I continue by downloading the “Windows_64bit.zip” version.
Then we extract the downloaded zip file with any extractor. Then we run the “gopish.exe” file that comes up in zip and start the service.

When we run it, we understand that the CMD screen is opened and serves from the https://127.0.0.1:3333 port as seen in the picture below.

After opening the browser, we make a request to https://localhost: 3333.

Since the page is HTTPS, if the browser prevents it, we need to add the “gophish_admin.crt” file to the browser we have used in the Gophish files we downloaded.

Installing Gophish on Ubuntu
We download the Gophish file with the command below.
ubuntu:~$ Wget https://github.com/gophish/gophish/releases/download/v0.10.1/gophish-v0.10.1-linux-32bit.zip
We open the file in Gophish zip format with the command below.
ubuntu:~$ unzip gophish_linux_32bit.zip
We set the Gophish ports with the command below. The only thing to do here is to keep 80 ports fixed where there is “phish _server”, otherwise it doesn’t go to the URL, you can change other ports.
ubuntu:~/ Downloads/gophish_linux_32bit$ nano config.json

We increase Gophishin authorization with the following command.
ubuntu:~/ Downloads/gophish_linux_32bit$ chmod u+x gophish
We are running Gophishi with the command below.
ubuntu:~/ Downloads/gophish_linux_64bit$ ./gophish
With the command below, we save the file from the Gophishin settings to the Time date 24 hours setting.
ubuntu:~/Downloads/gophish_linux_64bit/static/js/app$ nano campaign_results.js
With the following configuration, you can send messages to phishers by adding them to the source code in the Gophish landing pach page.
onclick = "cyber security ()

function SiberGuvenlik () {alert (“You are on the hook! Don't go on the hook again”); }
Run the Gophish interface
Although it is connected to the interface by port “3333” by default, this interface port can also be changed if desired. You can find the necessary settings in the file “config.json”.
Now it’s time to connect to the app’s web interface.
You can use the IP and user information below to connect to the interface of the GoPish framework.
The default settings are:
Portal: 127.0.0.1:3333
Username: admin
Password: gophish
When we connect to the portal, an extremely easy interface welcomes us.

The management panel that we have logged in is as follows;
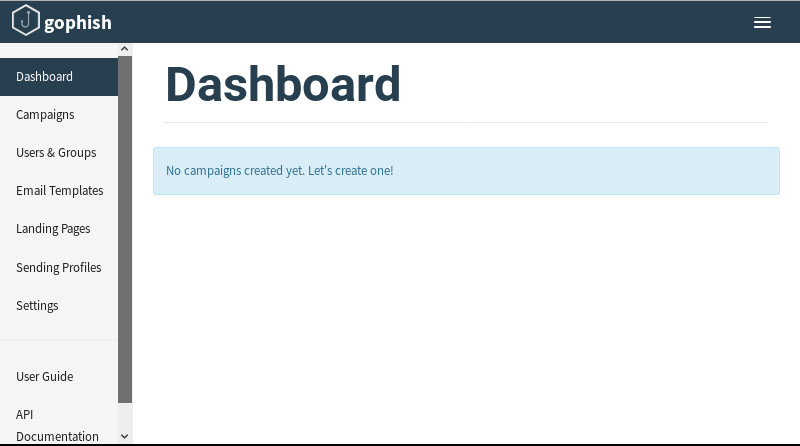
The titles and brief descriptions in the management panel are as follows;
Dashboard: This is the area where the results of phishing mailer we have created are analyzed in line with the information we have entered in other titles.
Campaigns: This is the section where adjustments are made for sending the phishing mail we have prepared. (The steps in this section will be explained in detail in the next steps)
Users & Groups: It is possible to enter the e-mail addresses created for sending the prepared phishing mail and the e-mail addresses that you have specified for this field to be entered in bulk instead of manually entering the CSV file.
* When preparing the CSV file, attention should be paid to the order in the columns as below,

Email Template: This is the area where our phishing e-mail is prepared as a template, we can prepare the e-mails as we want in this field or we can use the imported e-mails.
Landing Pages: One of the best features of the field is to provide the URL of the page that you want to phish and load the page in this field or you can create a page with your Html codes if you want.
Sending Profiles: It is the field where SMTP information is entered to send the prepared mails.
Settings: It is the area where the necessary settings are made for the management panel we use. (Since the application runs in your local, you don’t need to make any changes in this area.)
User Guide: If you want to go deeper in Gopshish, I recommend you to check the user manual.
API Documentation: For those who are wondering how the Gophish API is used, I recommend you to review the documents in this area.
* The explanations in the titles used in Gophish application, in general, are so much now, let’s test what we have said in practice with a scenario.
Sample Application
My advice is to start with the heading “Sending Profiles” first, and if we have problems realizing these steps, we realize that the other steps we have done do nothing.
Sending Profiles
Now let’s start making the settings to be able to send our Phishing mail by first heading to “Sending Profiles“.

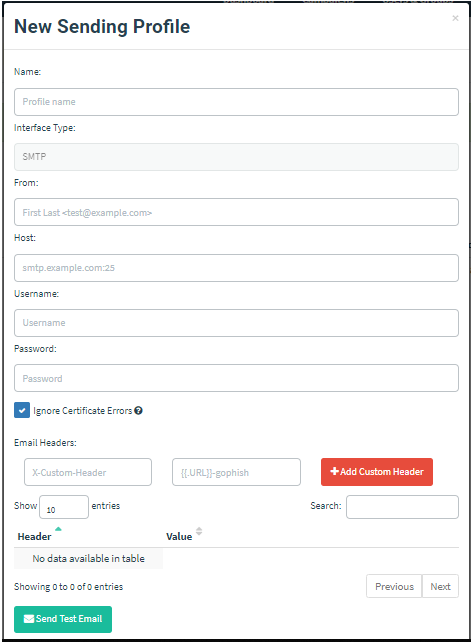
We press the “+ New Profile” button and the “New Sending Profile” window opens as below.
Let’s start filling in the fields above, but first, we need to choose which “smtp server” we will use, we will use the “sendgrid smtp server” settings here.
First of all, we need to be a member of https://sendgrid.com/ to make “sendgrid smtp server” settings, after clicking the link, we create a free trial account by clicking the “Try For Free” button.
Note: If you do not want to pollute your own e-mail address while signing up, you can use fake mail addresses at https://tempail.com, but some fake mail sites are recognized by SendGrid.

Then I will go to the relevant area so that I can see the SMTP settings. When we click on the field with the Account Settings in the upper left corner, when we go to the “Setup Guide” area, we click the “Start” button in the field that says “Integrate using our Web API or SMTP relay” as below.

Here are the “Web API” and “SMTP Relay” fields as below. We enter the “SMTP Relay” field.

After entering the SMTP Relay field, we see that the SMTP server information appears.

The important step to do here is to create a “key” for yourself. You can create the key creation process by giving a name to the text field as follows or you can create it by clicking the “API keys page” link.

After completing this process, we have prepared our SMTP settings. We are done on Sendgrid page. Now we can continue where we left off in our Gophish app.
If you remember, we would enter the information in the last “New Sending Profile” window. Now we can start filling the desired fields in this window.
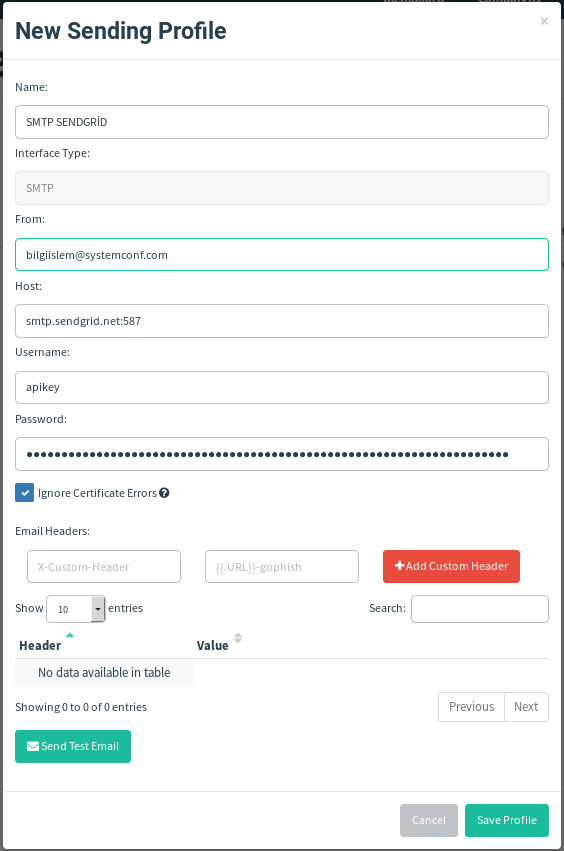
Let’s fill the relevant fields as above;
Name: Any name to identify the email address we will create.
Interface Type: Gophish will remain as it is because it supports SMTP is not changed anyway.
From: The e-mail address you will send (you can define the e-mail address you want).
Host: The SMTP host information we received from Sendgrid (smtp.sendgrid.net:587).
Username: The username we registered at Sendgrid.
Password: Key generated by Sendgrid address or created by us.
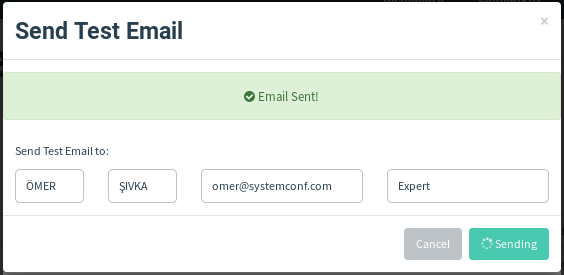
After completing these steps without any problems, we click the “Send Test Email” button at the bottom of the picture above to try our settings working without any problems. A window like below opens to us.

After the related fields are filled, we send our test mail by clicking the “Send” button. If our information in the fields in the Sending profile field is correct, we receive a positive warning message as below.
The email image received by the person we sent the test mail to is as follows;

Since we received this message, we have successfully completed our transaction. Now let’s move on to the next steps.
Landing Pages
We will come to the Landing Pages area and create the website that we will phishing. A nice feature of this field (if it is not blocked) is that it can pull the page that we have given its URL.
Below is the image of the “Landing Pages” field.

When we click the “+ New Pages” button above, we see the “New Landing Page” window as below. Let’s start filling the fields in the opened window now.

Name: The name we will give to the page draft we will create.
When we click on the “Import Site” button above, the “Import Site” window will open as follows.

After giving the URL address of the desired site to the “URL” field in this window, when we click the “import” button, we upload the page to gophish. The page we have loaded is displayed below.

After our page loading process is finished, “Capture Submitted Data” and “Capture Password” options should be selected as below. These options must be selected so that we can record the information entered by the people we send for phishing.
Note: It specifies the page to which the person submitting the phishing page wants to be directed to the URL field under the heading “Redirect to”.
Now that we have created our page for phishing, we are now creating the e-mail template that we will send.
E-Mail Templates
Below is the image of the “Email Templates” field.

We press the “+ New Template” button and the “New Template” window opens as below.

Name: The name of the e-mail template we will create.
Import Mail (Button): When we click on this button, we can transfer the mail drafts we prepared earlier to the gophish application.
Subject: The text that should be displayed in the header of our e-mail that we want to send.
Text (Tab): By coming to the Text tab, we can manually create the mail content we want.
Html (Tab): By coming to the Html tab, we can manually or paste the ready form Html codes or make any change we want. Our e-mail templates that we have added with the import method are automatically added to this field.
Add Files (Button): We can add files of any format to our e-mail that we want to send via the “Addfile” button.
There is another point to be considered here, we need to add the “Landing Page” page we have prepared to e-mail, or the e-mail we send remains only as e-mail.
Come to the HTML field as below and select the text (if any) field that we want to link, and click the button in yellow.
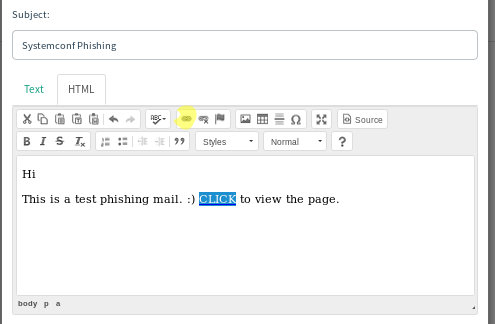
When we click, a window like the one below appears. The most important point here is to enter {{.URL}} in the URL field.

Note: While you are preparing your mail content, you can create a special e-mail for people with little touches like below. You must fill the FirstName, LastName, Email and Position fields when creating the group of person (s) to be e-mailed.
Sample:
Content of Prepared Mail Draft:

Hello {{.FirstName}} {{.LastName}}
Click to check your login with your {{.Email}} address.
Mail Content Displayed by the Recipient:

Hello Ömer Şıvka
Click to check your login with your omer@systemconf.com address.
Users & Groups
Now that we have set our e-mail content according to ourselves, we will now add the person (s) we will send to the queue.
Below is the image of the “User & Groups” field.

We press the “+ New Group” button and the “New Group” window opens as follows.
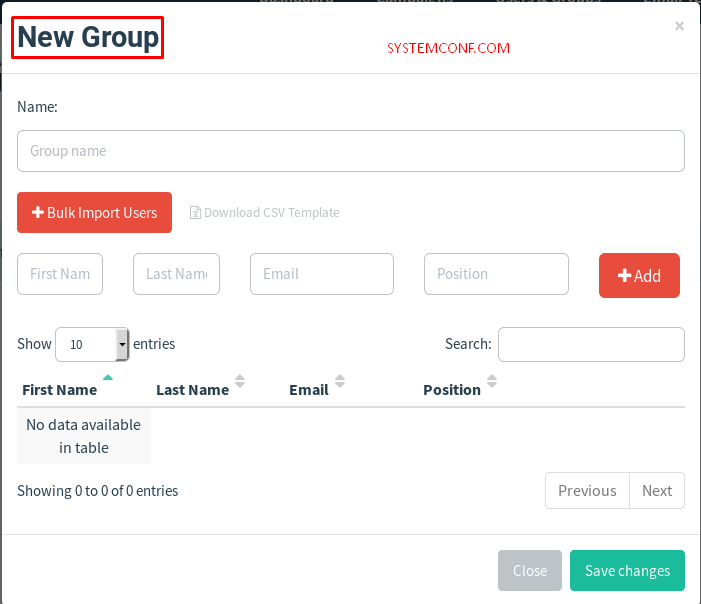
Name: The name we will give to the list of person (s) we will send.
+ Bulk Import Users (Button): If we have a list with ready-made e-mail addresses (I told you how to prepare the e-mail list in CSV format at the beginning of the article), we can upload our file in CSV format.
Adding as Manuel: After filling the Textbox fields with the following titles, you can add the relevant person by clicking the “+ Add” button.
First Name Last Name Email Position
Now that we have created our e-mail group, now it is sending our phishing mail.
Campings
Below is the image of the “Campaigns” area.
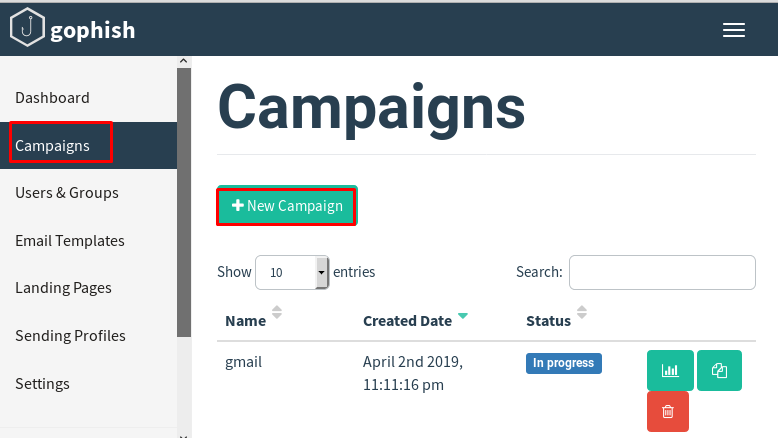
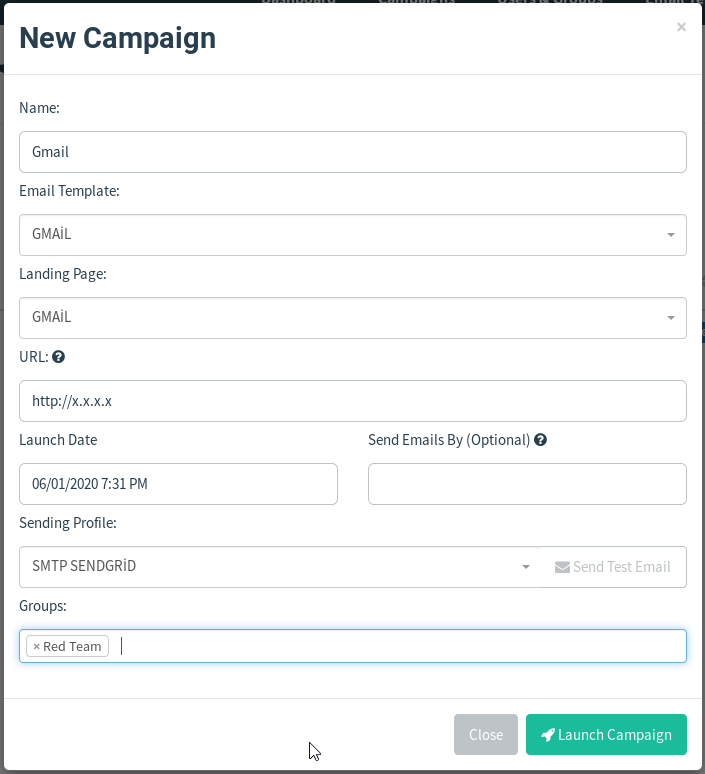
We press the “+ New Campaign” button, the “New Campaign” window opens as follows.
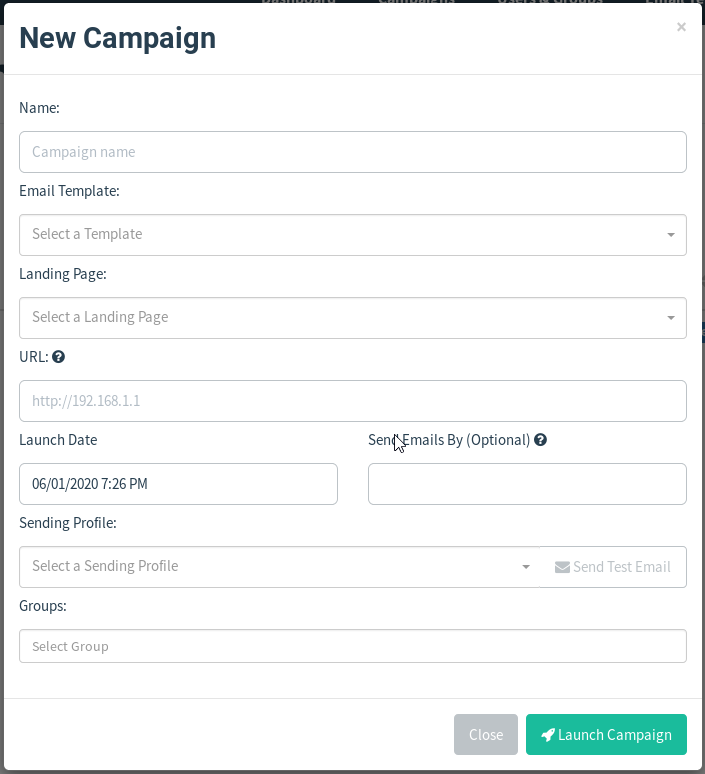
Name: The template name we created to send and analyze our phishing scenario.
Email Template: The area where the e-mail templates we have prepared are selected.
Landing Page: The area where the Landing Pages we have prepared are selected.
URL: In this field, we need to write the external IP address of the network we are in. (You will need to forward at the IP address where GoPhish application is running)
Schedule: The field where settings are made to send e-mails within the desired date and time.
Sending Profile: The area where the Sending Profiles we have prepared are selected.
Group: The area where the User & Groups we have prepared are selected.
Below is the image of the “Results for Gmail test” area.

We have now completed all our transactions. We have come to the area where we expect the person (s) to whom we have sent our phishing E-mails to return to us within the framework of our scenario.
Dashboard
Below is the image of the “Dashboard” area.

There is a “Target map” area in the Dashboard area. Since Sendgrid SMTP service does not support this area, there is no movement in this area.

The details of the phishing e-mail we sent are explained in the pictures below.

In order to end our sample scenario, when we click on the “Complete” button below, the link in the e-mail that we send becomes a disable state.
If we want to get the results we have reviewed as a report, just click on the “Export CSV” button. (You need to edit the report a little.)


