by
by The magic dcpromo command that we used during the installation of Active Directory Domain Services in Windows Server 2003, Windows Server 2008 and Windows Server 2008 R2 is now out of our lives with Windows Server 2012.
When you run this command on Windows Server 2012, Windows Server 2012 R2, Windows Server 2016 and Windows Server 2019, you get the following error.

Before proceeding with the installation and configuration of the Active Directory Domain Services role, we do the following steps.
- Editing the Computer Name of our server.
- IP Address configuration on our server
Do not lower your security standards by using Windows Server updates and configuring the recommended security settings using a weak AD administrator password.
Some new features in Windows Server 2019
With Server 2019, Azure Backup plans to significantly improve File Sync features such as computing, storage and network connections that will make it easier to connect to Microsoft Cloud services for disaster recovery situations.
Microsoft plans to reduce the size of the Server core image to 5 GB. Windows Admin Center full compatibility. Windows Defender Advanced Threat Protection. Extended Sets with Cluster Sets. Windows Defender ATP Exploit Protection. Protected VM: Offline Mode, VMConnect and Protected Linux support. Performance history for Direct Storage Spaces.
Setting the server name
The first thing we need to do after the server is installed is to change its name and IP address. While giving the IP address, we take care to give an empty IP address outside the DHCP pool.
We edit the Computer Name of our server as follows.

Setting a STATIC IP address
After editing the Computer Name of our server, we make the Internet Protocol Version 4 (TCP / IPv4) configuration. We write the IP Address of our server in the “Preferred DNS server” section. Together with Active Directory Domain Services, we configure it in this way as our server will operate as a Domain Name Server (DNS) Server in the environment. Every server that acts as a Server in your environment should always have an IP Address.
We follow the picture below to configure the computer network settings.

Aşağıdaki sayfada “Adaptör seçeneklerini değiştir” i tıklıyoruz.

Following the steps on the following page, “We enter the IP address and DNS. Since the DNS address is itself, we enter the same IP address.

Installing Windows Server 2019 Domain
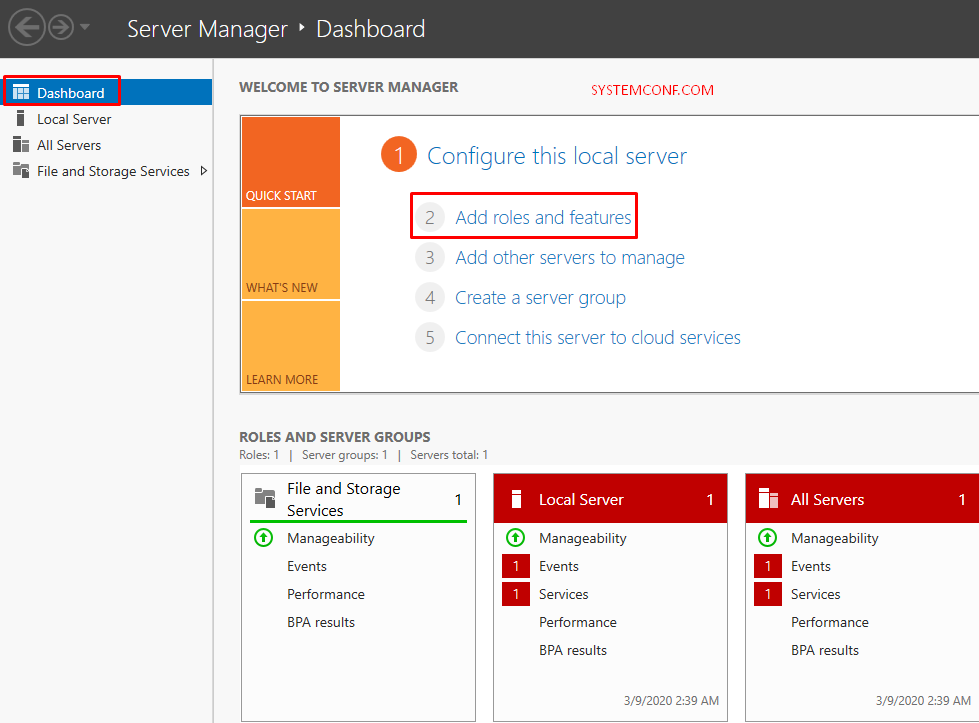
After completing the necessary configuration on our server, we open the “Server Manager” console.
We click “Add Roles and Features” on the “Dashboard” screen. If you wish, we can open the “Add Roles and Features” wizard with the “Manage” menu in the upper right corner.
On the “Before You Begin” screen, we continue by saying “Next” to install and configure “Active Directory Domain Services Roles”.

The “Role-based or feature-based installation” option on the “Select Installation Type” screen is the option that we install and configure. Roles and Features that we need on Windows Server 2019 can be installed and configured with this option.
“Remote Desktop Services installation” option You can do Remote Desktop Services (RDS) Remote Desktop installation and configuration with this option, which is formerly known as Terminal Service (TS).
Since we will configure the Active Directory Domain Services role on the “Select Installation Type” screen, we continue by saying “Next” with the “Role-based or features-based Installation” option.

On the “Select destination server” screen, we need to select the server on which server it will be installed. Since we will configure the “Active Directory Domain Services” role on ADSRV, we select this server and continue to configure it by saying Next.

In the “Select server roles” screen, we mark the “Active Directory Domain Services” role as we will configure it by installing the “Active Directory Domain Services” role on our server.

When we select the “Active Directory Domain Services” role, we see the “Add Roles and Features Wizard” screen. We continue by saying “Add Required Features” to continue the installation and configuration of “Group Policy Management” and “Remote Administration Tools” roles along with the role of “Active Directory Domain Services“.

Since the “Select server roles” screen is ready to install and configure the “Active Directory Domain Services” role on our server, we continue by saying “Next“.

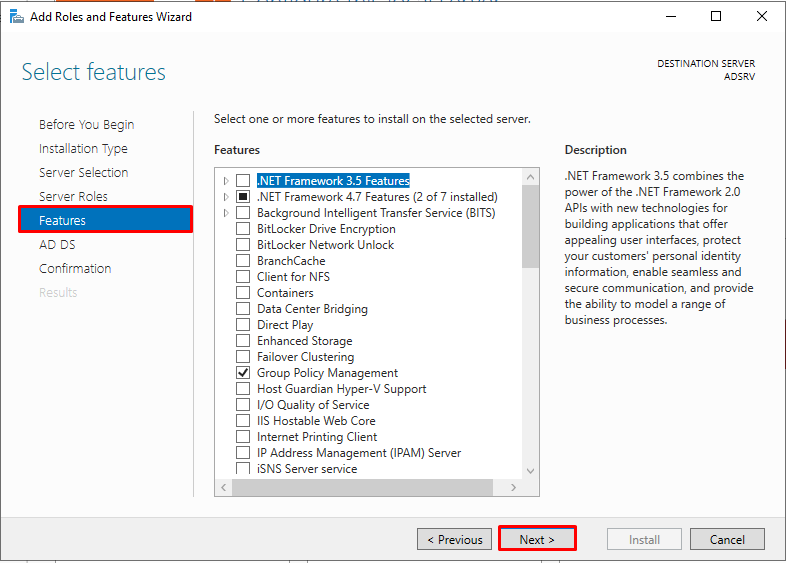
In the “Select features” screen, we see the Features that we can install on our server. When we selected the Active Directory Domain Services role, we permitted to install the Active Directory Module for Windows Powershell, Active Directory Administrative Center, AD DS Snap-Ins and Command Line Tools Features, which are required under the Group Policy Management and Remote Administration Tools required for the Active Directory Domain Services role. For this reason, we will not choose any Features of the Select features screen.
We continue by saying “Next” on the “Select features” screen without selecting anything.
The “Active Directory Domain Services” screen appears this screen is one of the innovations we came across with Windows Server 2016. Here, we can enable the “Active Directory Domain Services” role that we will configure with “Configure Office 365 with Azure Active Directory Connect” option to work with “Office 365” and “Azure Cloud” Platform. We continue by saying “Next” on this screen.

Here is a summary of our choices up to now on the “Confirm installation selections” screen. Let’s start the installation by selecting “Install“.

In the “Installation progress” screen, we see that the Active Directory Domain Services role and other features have been installed. Let’s continue by choosing “Close”.


Installation progress
We also see that the “Active Directory Domain Services” role has been installed and needs to be configured on the Server Manager.

We have three options on the Deployment Configuration screen.
Add a domain to an existing domain: We need to select this option to configure a new Domain Controller within our existing Forest structure. So when we make an Additional Domain Controller configuration to our environment, we tick this option.
Add a new domain to an existing forest: We need to select this option to configure a new Domain within our existing Forest structure. In other words, there is a Domain named systemconf.local in our existing Forest structure and we mark this option when we are going to configure another Domain named systemconf.local in this Forest structure.
Add a new forest: We mark this option when we will make a new Forest and Domain configuration to our environment. In other words, if there is no Domain Controller structure in our environment, we continue with this option.

We mark the “Add a new forest” option as we will establish and configure a new Domain structure in a new Forest for our environment. We write the Domain Name that we will configure in the “Root domain name” section and continue by saying “Next”.

On the “Domain Controller Options” screen, “Forest functional level” and “Domain functional level” levels were the same as the current version. However, Windows Server 2016 Forest functional level and Domain functional level levels are used on Windows Server 2019.
In the “Specify domain controller capabilities” section, Domain Name System (DNS) Server has a similar hierarchical naming structure that can be presented as both Active Directory and DNS, both Active Directory objects and DNS domains and resource records. As a result of this integration, computers on the Windows Server Network use DNS Servers to locate computers running certain services that are specific to Active Directory. Windows Server requires pre-creating the DNS infrastructure of the Domain to be created before installing the Active Directory organization. If the DNS infrastructure of the Domain to be created is not prepared before the installation, the DNS infrastructure can be installed during the installation.
Global Catalog (GC): Global Catalog is the information store that carries a subset of the properties of all objects in Active Directory. These hosted features, by default, are the most commonly used features during queries.
Read-Only Domain Controller (RODC): It is the feature that comes with Windows Server 2008. Read-Only Domain Controller (RODC) has a different structure than Active Directory Domain Services servers. It is precisely a type of Domain Controller that hosts the Active Directory database but does not have the right to write to the database.
Directory Services Restore Mode (DSRM) password: This is the special method we use to return Active Directory backup in Microsoft Domain environments. To use Directory Services Restore Mode (DSRM), you need to select the directory services to restore mode section by pressing the F8 key while your computer or server is starting up.
In the Domain Controller Options screen, we are writing Complex Password that we will use for Active Directory Restore Mode in the password section without making any changes in the Specify domain controller capabilities section. We continue by saying “Next”.
NOTE: You can change the password you set for Directory Services Restore Mode (DSRM) later.

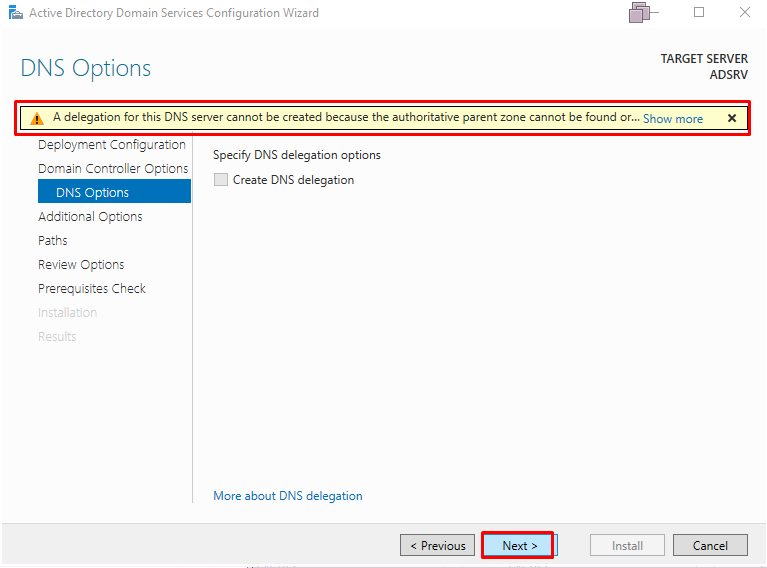
In the “DNS Options” screen, if we already have a DNS Server structure on our server, a Delegation assignment can be made to our newly established DNS Server server on the existing DNS Zone. We do not make any selection on the “DNS Options” screen, we continue by saying “Next”.
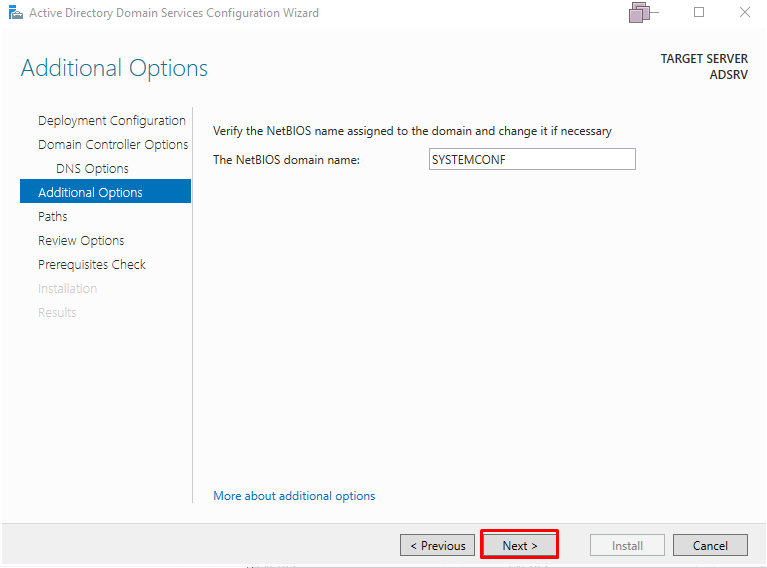
In the “Additional Options” screen, we see the name NETBIOS name that we will use for the Domain structure. We continue by saying Next.
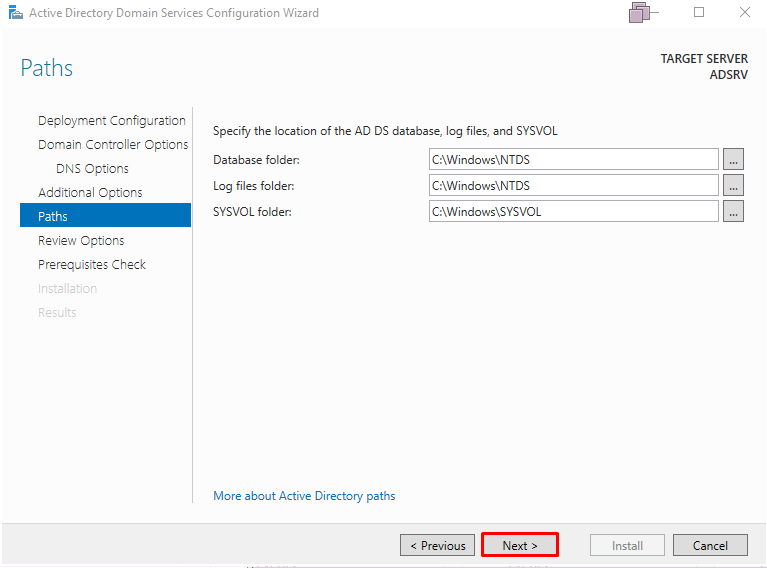
In the “Paths” screen, we determine the directories where our Active Directory Domain Services structure will be installed in the Database folder, Log files folder and SYSVOL folder. We do not make any changes to the default directories on the Paths screen and continue by saying “Next”.
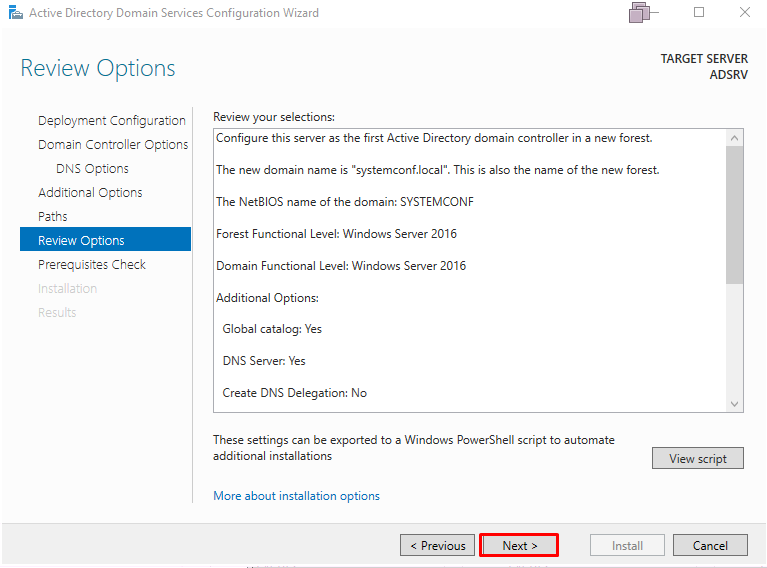
On the “Review Options” screen we see a list of the options we made during the configuration of the Active Directory Domain Services role. By clicking the “View Script” section, we can install the configuration we made for the role of Active Directory Domain Services as the “PowerShell” command.
We continue by saying “Next” to configure the Active Directory Domain Services role in the “Review Options” screen.
The “Prerequisities Check” screen will also check for the role of Active Directory Domain Services on our Windows Server 2019 server to check for any problems or deficiencies. When the necessary checks for the Active Directory Domain Services role are completed, “All Prerequisite check passed successfully. Click” Install “to begin installation”. We see the message. We can start the installation by saying “Install”

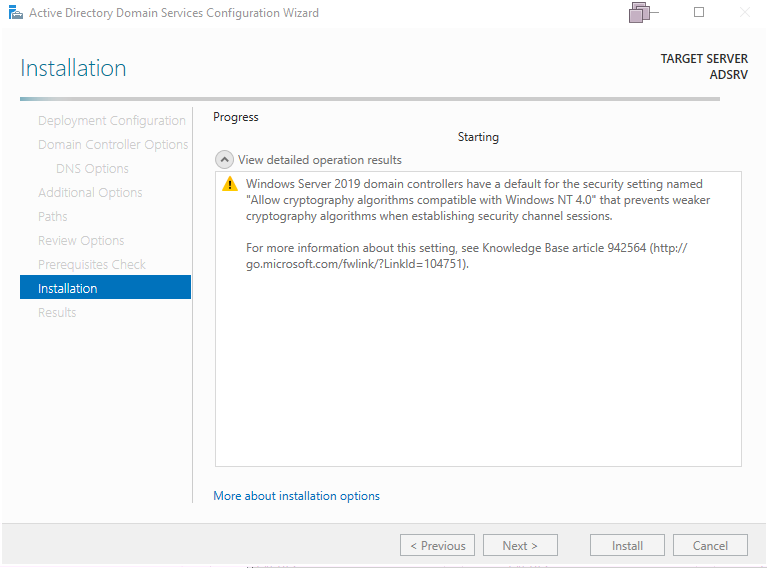
We see that the configuration of the Active Directory Domain Services role on the “Installation” screen has started on our server.
Configuration of the Active Directory Domain Services role on our server is completed. We get the information that our presentation will be restart.
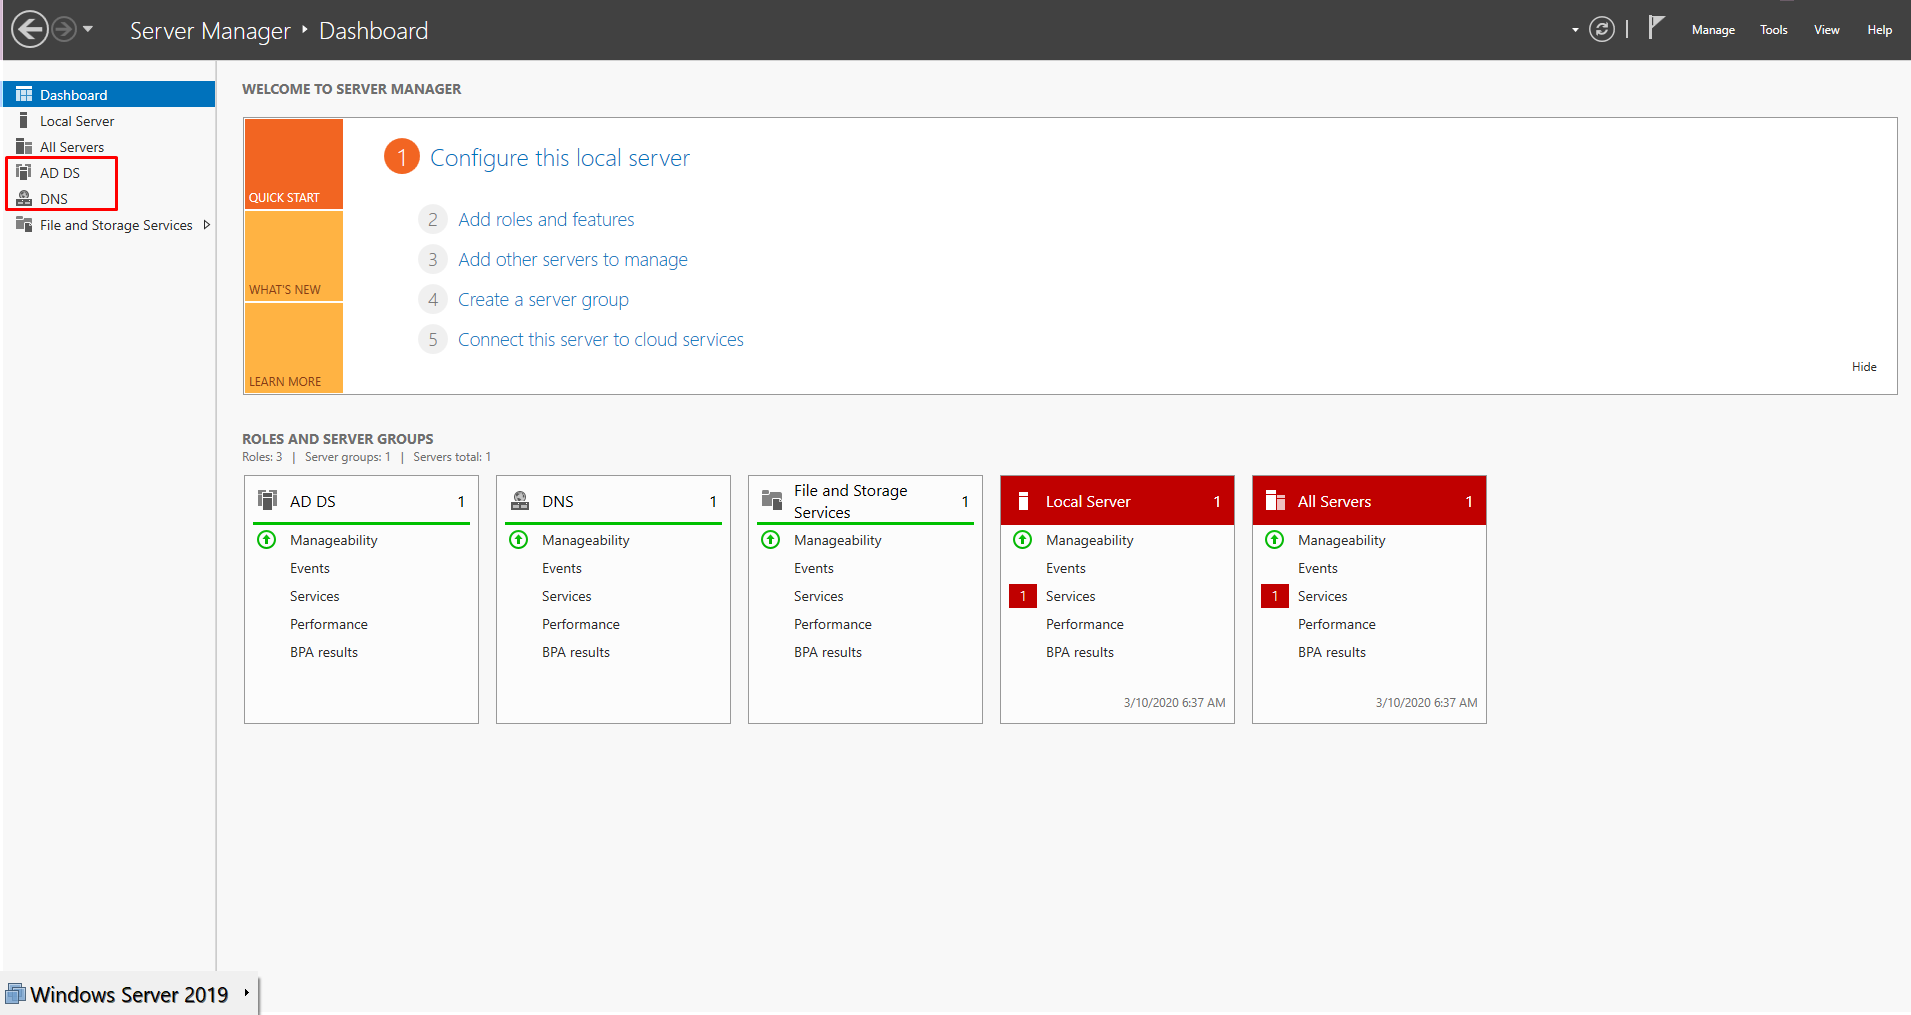
After our server is restarted, we see that Active Directory Domain Services (AD DS) and Domain Name Server (DNS) roles come to the Server Manager console.
We see consoles related to the role of “Active Directory Domain Services” under “Administrative Tools“.