 by
by It is a server that provides time information to NTP (Network Time Protocol) clients. NTP peer is a server that provides and receives time from other NTP servers. So you can have a bunch of NTP jobs supplying time information to each other. NTP client is a server that only receives time information from NTP servers to keep its own time-synchronized.
We can set up an NTP server to be the local system time. We may refer to such a server as a local time NTP server and will provide timely information to NTP clients. It is a good solution for a private network where it is more important to have synchronized time rather than the accurate time. So we’re going to get time information from a local time NTP server. For this, we follow the steps below.
NTP Installation on CentOS 7
- First, we install the NTP rpm package with the “yum install ntp” command.
[root@localhost ~]# yum install ntp

- We enter the NTP configuration file with the command “/etc/ntp.conf“.
[root@localhost ~]# vi /etc/ntp.conf

- Here we comment on the existing server entries and add the following line. Here, “192.168.1.10” is the NTP server IP address used to instruct the ip NTP to use its system clock as the correct time provider.
server (NTP server ip)

- In the next step, we allow firewall updates to allow time requests from ntp clients.
[root@localhost ~]# firewall-cmd --permanent --add-service=ntp

- In the next step, we allow firewall updates to allow time requests from ntp clients.
[root@localhost ~]# systemctl restart firewalld.service

- Then we start and enable the ntpd service.
[root@localhost ~]# systemctl start ntpd

[root@localhost ~]# systemctl enable ntpd


- You can check if the ntpd daemon is listening on the port to verify.
Note: Ntp listens on a UDP port.
[root@localhost ~]# ss -atun | grep 123

- Then we enable time synchronization.
[root@localhost ~]# timedatectl set-ntp true

- Now we can check if this works by running it.
[root@localhost ~]# ntpq -p

- We test it by running the “ntpstat” command. If a screen like the one below does not appear, reboot the server.
[root@localhost ~]# ntpstat

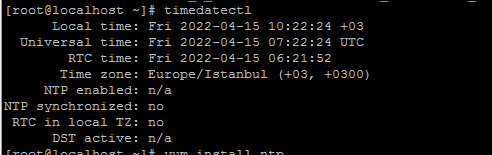
- Note that it appears as out of sync. If so, we may have to wait about 30 minutes.
[root@localhost ~]# timedatectl

- After 30 minutes we run the “ntpstat” command again.
[root@localhost ~]# ntpstat

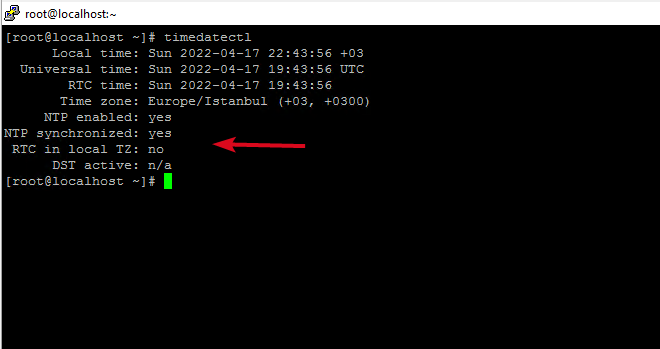
- It appears to be successfully synchronized.
[root@localhost ~]# timedatectl
Note: The steps involved are the same as installing the NTP server. The only difference is that instead of adding a Server line, we add a line referencing the ip address of our new NTP server.